環境 Macbook pro retina
使用 VirtualBox 安裝 CentOS 7 ,版本:CentOS-7-x86_64-DVD-1511 ,選用最小安裝,做為PHP開發環境,所以將安裝:
- VirtualBox 網路設定
- CentOS 7 安裝 (略)
- Apache網頁伺服器
- MariaDB資料庫伺服器(CentOS 7將 MySQL換成 MariaDB,沒用過,順便看看好不好用)
- 設置防火牆
- PHP套件
- VirtualBox 網路設定:
- 在『僅限主機』網路增加一張網卡(都先採用預設)


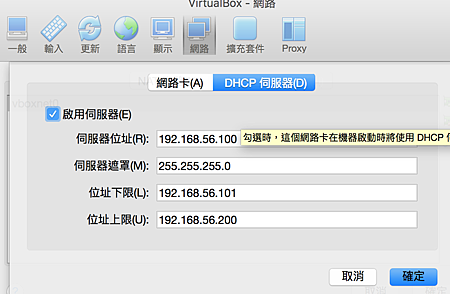
- 虛擬機的網路設定:設定兩張網卡
- 第一張網卡使用NAT,做為連外用
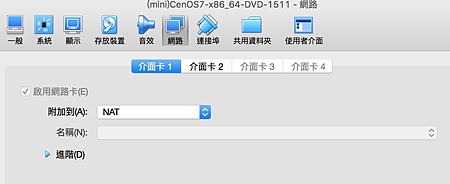
- 第二張則採用 Host only,只是用來做內部連結。

- CentOS 安裝過程..... 略
CentOS 7 最小安裝,裝好後.... 嗯... 網路不通...
#ifconfig -a
看一下,![]() 呃...找不到指令,原來CentOS 7最小安裝預設沒有 ifconfig , netstat, CentOS & 小紅帽都要改新指令了,所以要嘛就安裝net-tools, 要不就學新指令,這裡網路還沒有通,所以只好先用新指令 ( #ifconfig --> #ip addr , #netstat --> #ss , #traceroute --> #tracepath , #route --> #ip -route )。
呃...找不到指令,原來CentOS 7最小安裝預設沒有 ifconfig , netstat, CentOS & 小紅帽都要改新指令了,所以要嘛就安裝net-tools, 要不就學新指令,這裡網路還沒有通,所以只好先用新指令 ( #ifconfig --> #ip addr , #netstat --> #ss , #traceroute --> #tracepath , #route --> #ip -route )。
#ip addr
查看結果沒有IP
#nmcli d
看一下,發現網卡沒開
查一下設定檔
#cat /etc/sysconfig/network-scripts/ifcfg-eth0
ONBOOT=no 網卡沒有在開機時自動啟用,那就改一下設定檔,可以用
#vi /etc/sysconfig/network-scripts/ifcfg-eth0 修改設定值,也可以用
#nmtui


設定結束,重啟一下網路
#systemctl restart network
網路通了,先裝 net-tools , 這樣就可以用原來的指令 ifconfig / netstat / route / traceroute
#yum install net-tools
#yum install traceroute
再來先更新一下 CentOS
#yum update
- 安裝網頁伺服器
#yum install httpd
#systemctl restart httpd.service 重啟網頁伺服器
#systemctl enable httpd.service 設置為開機啟動httpd
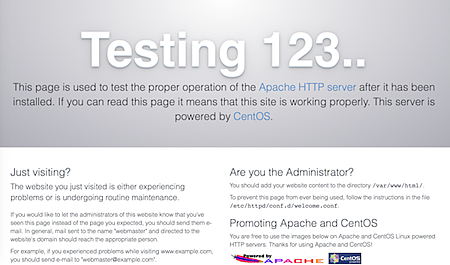
用瀏覽器開啟看到這個測試畫面就代表Apache已經啟動了
- 安裝MairaDB資料庫伺服器
#yum install mariadb mariadb-server
#systemctl restart mariadb.service 重啟資料庫伺服器
#systemctl enable mariadb.service 設置為開機啟動 Mariadb
- 設定MariaDB
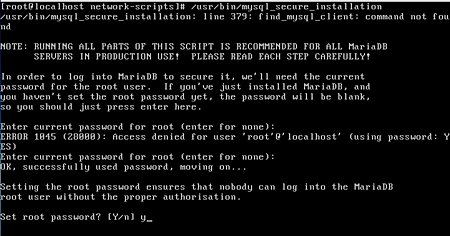
#/usr/bin/mysql_secure_installation
- 因為是新安裝,所以直接Enter進行下一步

- 是否設定root(mariadb root)密碼,當然要設定囉!Y,輸入兩次相同密碼 (密碼長度請勿小於8碼)。
- 選擇Y刪除匿名帳號,避免一些安全問題

- Disallow root login remotely? Y 限制root只能由本地端連線
- Remove test database and access to it? Y 刪除測試資料庫
- Reload privilege tables now? Y 重新載入權限表

MariaDB基本設定好了!

重新啟動 MariaDB
#systemctl restart mariadb.service
- 設置防火牆
- yum install firewalld
- systemctl unmask firewalld
- systemctl enable firewalld
- systemctl start firewalld
- #firewall-cmd --list-all --permanent 查看防火牆設置規則 (--permanent 為永久規則)
- #firewall-cmd --add-service=http --permanent 永久允許http服務通過防火牆
- #firewall-cmd --add-service=https --permanent 永久允許https服務通過防火牆
- #systemctl restart firewalld.service 重新啟動防火牆
- 安裝PHP
#yum install php php-devel 其他的依需求安裝 php-mysql php-ldap php-odbc php-mbstring php-gd libjpeg* php-pear php-xml php-xmlrpc php-bcmath php-mhash

#rpm -qa | grep php 查看已安裝的php套件

#rpm -qa 查看所有已安裝套件,#rpm -qi php-mysql 查詢特定套件安裝資訊(以php-mysql為例),#rpm -ql php-mysql 查詢套件所安裝的檔案(以php-mysql為例)
#systemctl restart httpd.service 重啟apache網頁伺服器
#vi /var/www/html/index.php 使用vi編輯器寫入以下內容
<?php
phpinfo();
Esc 跳出編輯
:wq! 存檔離開
用瀏覽器開啟網站,成功的話可以看到PHP配置內容
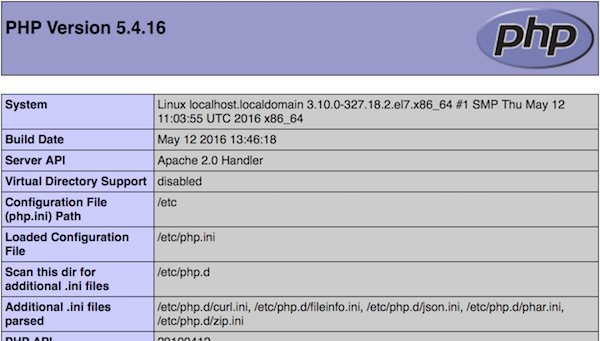
基本的環境就完成囉!
記錄完畢!


 留言列表
留言列表


